Remote Access: Difference between revisions
m (→File Transfer) |
mNo edit summary |
||
| Line 36: | Line 36: | ||
Welcome | Welcome | ||
[netid@hpcXX]$ | [netid@hpcXX]$ | ||
=== Advanced configs === | |||
== File Transfer == | == File Transfer == | ||
| Line 98: | Line 99: | ||
==== Filezilla ==== | ==== Filezilla ==== | ||
==== WinSCP ==== | ==== WinSCP ==== | ||
Revision as of 14:56, 4 October 2021
Access to the HPC-clusters is limited from outside the TU Delft network for security reasons.
When you use a VPN-connection direct access from your desktop/laptop to the HPC is possible. You can use your application of choice for this connection.
When you don't use a VPN you should connect through a Bastion server, which is described below.
Bastion
The TU Delft offers two bastion servers. These servers can be used to tunnel your traffic to the HPC.
- linux-bastion.tudelft.nl for employees or guests.
- student-linux.tudelft.nl for students.
Console access
The explanations below are the simplest way to connect to a console on an HPC. Advanced configs describes more complex configurations which save time when regularly using the connection.
Command line
When your desktop/laptop supports ssh from the console, you can connect to the bastion server and from there you can connect to the HPC:
  [user@home]$ ssh <netid>@linux-bastion.tudelft.nl
    netid@linux-bastion.tudelft.nl's password:
  [netid@bastion]$ ssh <netid>@hpcXX.tudelft.net
    netid@hpcXX.tudelft.net's password:
    Welcome
  [netid@hpcXX]$
- Replace <netid> with your NetID (also remove the <>)
- When your a student replace <netid>@linux-bastion.tudelft.nl with <netid>@student-linux.tudelft.nl
- Replace <netid>@hpcXX.tudelft.net with the HPC you are connecting to.
Putty
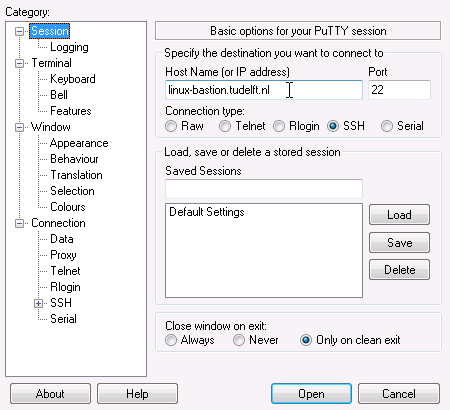
When your desktop/laptop doesn't support ssh from the console, you can use Putty (it may already be installed).
- Session Settings
Fill in the name of the TU Delft SSH server linux-bastion.tudelft.nl (student-linux.tudelft.nl for students), and select the SSH protocol (port 22):
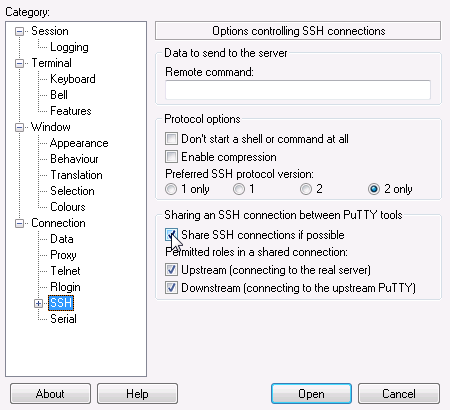
- OPTIONAL: Connection>SSH Settings
Select Share SSH connections if possible (this means that you will not have to authenticate when you start a second session):
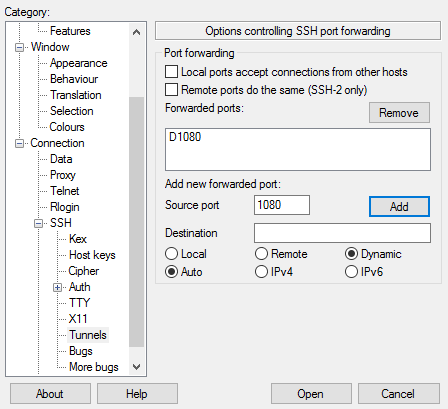
- OPTIONAL: Connection>SSH>Tunnels Settings (This allows other applications to tunnel trafic through the bastion host)

- Source Port: 1080
- Dynamic & Auto
- Press "Add"
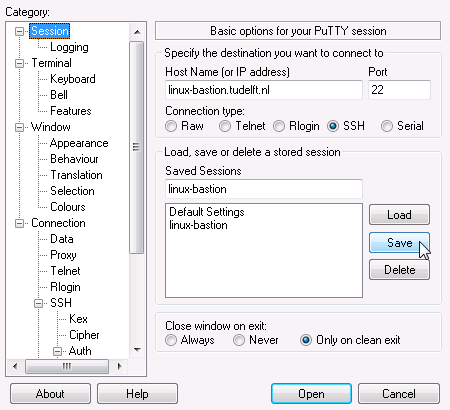
- Session Settings
To store these session settings, go back to the session tab, and save the settings under a session name. To activate a stored session, double-click on the session name:
Once you're connected to the bastion server you can use the locally available ssh to connect to a HPC:
  [netid@bastion]$ ssh <netid>@hpcXX.tudelft.net
    netid@hpcXX.tudelft.net's password:
    Welcome
  [netid@hpcXX]$
Advanced configs
File Transfer
The best method for transfering files depends on where you want to store your files:
- Files in your home directory on HPC are only available within HPC
- Files on Network Shares are available on other locations (such as a TU Delft workplace, weblogin.tudelft.nl or other HPC clusters)
Copying files to these shares is best done using the manuals on webdata.tudelft.nl
When you want to copy files to the HPC you can copy them from Network Shares
Authenticate
It is possible to access the group and bulk shares of your research group. It is required that you have logged in using your password. If you logged in with an ssh public/private keypair instead of your password, you need to authenticate first with:
kinit
This will ask you to type your password. This authentication is valid for about eight hours, after that you have to authenticate again.
Basic access
Now just type (depending on which share you want to use):
cd /tudelft/$USER/staff-group/
cd /tudelft/$USER/student-group/
cd /tudelft/$USER/staff-bulk/
cd /tudelft/$USER/staff-umbrella/
and navigate from there to the directories that you need.
You can access your Windows home directory as well. The subdirectories of the home directories are followed by the first letter of your surname and then your netid.
For example, if your name would be John Smith and your netid jsmith;
cd /tudelft/$USER/staff-homes/s/jsmith
cd /tudelft/$USER/student-homes/s/jsmith
Important note
The $USER part in the commands above is a shell variable that contains your netid. You can also substitute $USER for your netid yourself. If your netid would be jsmith, the command
cd /tudelft/jsmith/staff-homes/s/jsmith
would work just as well. Please do not substitute $USER with anything else than your own netid!
If you use anthing other than your own netid you'll create a recipe for potential disaster!
If you and a coworker need to access te same data on a group or bulk volume at the same time, you both use different paths.
So /tudelft/jsmith/staff-group/ only works if your netid is jsmith and /tudelft/pbrown/staff-group/ only works works if your netid is pbrown.
If both netids have the same privileges for accessing the group volumes, then these commands give access to the same data.
Data on HPC
If you want to transfer data directly to the HPC you will need some extra configuration
Command line
Please first configure proxying with openssh.
To transfer files you can use scp, which is very similar to ssh
- Copy the file 'projects.txt' from your remote home directory on HPC to the local home directory on your desktop or laptop.
scp <netid>@hpcXX.tudelft.net:~/projects.txt ~
- Copy an entire directory with all its content, use the '-r' option
This will copy the directory 'projects' from your remote home directory on HPC to the local home directory on your desktop or laptop:
scp -r <netid>@hpcXX.tudelft.net:~/projects/ ~
- Copy the file 'projects.txt' from your local home directory on your desktop or laptop to your remote home directory on HPC.
scp projects.txt <netid>@hpcXX:~/
- Copy the directory 'projects' and all its content from your current working directory on your desktop or laptop to your remote home directory on HPC.
scp -r projects/ <netid>@hpcXX:~/