How to log in: Difference between revisions
(→Basics) |
|||
| (21 intermediate revisions by the same user not shown) | |||
| Line 1: | Line 1: | ||
== | == Basics == | ||
In order to log in you need a valid [https://www.tudelft.nl/en/student/ict/ict-facilities/netid-account/ NetID] that is enabled for access to one of the clusters. To have your NetID enabled, ask the contact person for the cluster you want access to (See the [[Introduction]] page) or ask the secretary of the department or research group where you work, he or she can tell you who the contact person is for an hpc cluster. | |||
If you want to collaborate with someone from outside the TU Delft and you want that person to access the same cluster as you, then you can request a guest account at the servicedesk. Once the guest account is created, it can be enabled for access to one of the clusters. '''Do not share your own NetID with others! Your NetID is for personal use only, sharing it with other people is forbidden!''' | |||
If you are a | The hpc clusters are only accessible via ssh (secure shell). To log in you need an ssh client. If you use Windows, you can download and use [http://www.chiark.greenend.org.uk/~sgtatham/putty/ PuTTY], Macintosh and Linux computers already have an ssh client built in. | ||
You can only log in when you are on campus via a wireless (eduroam) or wired network. When you are off campus, you can log in using eduVPN (Institute Access). As of 16 Januari 2025 you can no longer use to the Linux bastion hosts when you are not on campus. There is also no need to use the Linux bastion hosts when you are on campus or using an active eduVPN connection. | |||
Every time you log in you'll see an motd (message of the day). Please pay attention to this, it may contain information about current events on the cluster. It also shows you an email address that you can use if there are problems or if you have questions. You can mail at any time you like, but you'll usually only get a reply during office hours, there is no 24/7 support on the hpc clusters. | Every time you log in you'll see an motd (message of the day). Please pay attention to this, it may contain information about current events on the cluster. It also shows you an email address that you can use if there are problems or if you have questions. You can mail at any time you like, but you'll usually only get a reply during office hours, there is no 24/7 support on the hpc clusters. | ||
| Line 80: | Line 82: | ||
And this will copy the directory 'projects' and all its content from your current working directory to the home directory on the remote machine. | And this will copy the directory 'projects' and all its content from your current working directory to the home directory on the remote machine. | ||
== How to display graphical applications == | |||
=== Windows === | |||
There are several options for displaying graphical applications on a Windows system. A basic option is [http://www.straightrunning.com/XmingNotes/ Xming]. You can download it from: http://www.straightrunning.com/XmingNotes/ The site asks for a donation to use the latest version, but there is also a public domain version which can be used for free. Once you have installed it, you can find it in the usual place in the start menu. Before you log in to an hpc cluster and run graphical applications, you need to start Xming first. It will not show much, only a small X in the system tray once it's running. You also need to enable X forwarding in PuTTY. For that you need to click on the + next to SSH in the session panel (left part of the window), then click on X11. You'll see a line on the right side that says "Enable X11 forwarding", click once on the white square next to that line and it will show a check mark. | |||
[[File:PuTTY_04.png|center]] | |||
Now you can continue logging in to the hpc cluster. To check if X forwarding works, type <code>xeyes</code> on the command line, this will show a small window on your screen with two eyes that will follow the mouse pointer. | |||
[[File:Xeyes.png|center]] | |||
An alternative option for displaying graphical applications is Exceed, this is a commercial package for which the TU Delft has a license. It is not available by default on the standard Windows systems, but it can be installed upon request if you contact the servicedesk. | |||
A second alternative is [https://mobaxterm.mobatek.net/ MobaXterm], this is an all-in-one solution containing an ssh client, X server and more. You can download a free version from: https://mobaxterm.mobatek.net/download.html The free version has some limitations, but it's still perfectly usable in our environment. | |||
=== Mac OS X === | |||
For displaying graphical applications on a Mac OS X system you need a software package called [https://www.xquartz.org/ XQuartz] which can be downloaded from: [https://www.xquartz.org/ https://www.xquartz.org/] This will run on Mac OS X v10.6 and higher. Once it's installed, you end up with an application called XQuartz located in /Applications/Utilties. There is no need to start it first before you log in to an hpc cluster, it will start automatically as soon as it is needed. The only thing you need to do is add the option <code>-X</code> to the <code>ssh</code> command that you use to log in: | |||
ssh -X <netid>@hpc10.tudelft.net | |||
You can test if this works by typing <code>xeyes</code> on the command line, this will show a small window on your screen with two eyes that follow the mouse pointer. If it doesn't work, try the <code>-Y</code> option: | |||
ssh -Y <netid>@hpc10.tudelft.net | |||
=== Linux === | |||
Most Linux workstations come with a graphical environment. This works transparantly with the graphical applications on the hpc clusters. The only thing you need to do is add the option <code>-X</code> to the <code>ssh</code> command that you use to log in: | |||
ssh -X <netid>@hpc10.tudelft.net | |||
You can test if this works by typing <code>xeyes</code> on the command line, this will show a small window on your screen with two eyes that follow the mouse pointer. If it doesn't work, try the <code>-Y</code> option: | |||
ssh -Y <netid>@hpc10.tudelft.net | |||
== How to access your Windows network shares == | == How to access your Windows network shares == | ||
It is possible to access the group and bulk shares of your research group, just type: | === Authenticate === | ||
It is possible to access the group and bulk shares of your research group. It is required that you have logged in using your password. If you logged in with an ssh public/private keypair instead of your password, you need to authenticate first with: | |||
kinit | |||
This will ask you to type your password. This authentication is valid for about eight hours, after that you have to authenticate again. | |||
=== Basic access === | |||
Now just type: | |||
cd /tudelft/$USER/staff-group/ | cd /tudelft/$USER/staff-group/ | ||
cd /tudelft/$USER/staff-bulk/ | |||
cd /tudelft/$USER/staff- | or | ||
cd /tudelft/$USER/staff-umbrella/ | |||
and navigate from there to the directories that you need. | and navigate from there to the directories that you need. | ||
| Line 104: | Line 156: | ||
cd /tudelft/$USER/student-homes/s/jsmith | cd /tudelft/$USER/student-homes/s/jsmith | ||
=== Important note === | |||
The <code>$USER</code> part in the commands above is a shell variable that contains your netid. You can also substitute <code>$USER</code> for your netid yourself. If your netid would be <code>jsmith</code>, the command | |||
cd /tudelft/jsmith/staff-homes/s/jsmith | |||
would work just as well. Please do not substitute <code>$USER</code> with anything else than your own netid! | |||
'''If you use anthing other than your own netid you'll create a recipe for potential disaster!''' | |||
If you and a coworker need to access te same data on a group or bulk volume at the same time, you both use different paths. So | |||
cd /tudelft/jsmith/staff-group/ | |||
only works if your netid is jsmith and | |||
cd /tudelft/pbrown/staff-group/ | |||
only works works if your netid is pbrown. | |||
If both netids have the same privileges for accessing the group volumes, then these commands give access to the same data. | |||
Latest revision as of 13:42, 21 January 2025
Basics
In order to log in you need a valid NetID that is enabled for access to one of the clusters. To have your NetID enabled, ask the contact person for the cluster you want access to (See the Introduction page) or ask the secretary of the department or research group where you work, he or she can tell you who the contact person is for an hpc cluster.
If you want to collaborate with someone from outside the TU Delft and you want that person to access the same cluster as you, then you can request a guest account at the servicedesk. Once the guest account is created, it can be enabled for access to one of the clusters. Do not share your own NetID with others! Your NetID is for personal use only, sharing it with other people is forbidden!
The hpc clusters are only accessible via ssh (secure shell). To log in you need an ssh client. If you use Windows, you can download and use PuTTY, Macintosh and Linux computers already have an ssh client built in.
You can only log in when you are on campus via a wireless (eduroam) or wired network. When you are off campus, you can log in using eduVPN (Institute Access). As of 16 Januari 2025 you can no longer use to the Linux bastion hosts when you are not on campus. There is also no need to use the Linux bastion hosts when you are on campus or using an active eduVPN connection.
Every time you log in you'll see an motd (message of the day). Please pay attention to this, it may contain information about current events on the cluster. It also shows you an email address that you can use if there are problems or if you have questions. You can mail at any time you like, but you'll usually only get a reply during office hours, there is no 24/7 support on the hpc clusters.
Please note: You have a local home directory on the cluster. No backups will be made of the home directories, if you make a mistake and loose a file, it is gone forever. Making backups of your important files on the hpc clusters is your own responsibility!
How to log in from Windows
An often used ssh client for Windows is PuTTY. If you use a Windows PC or a laptop that is provided and maintained by the TU Delft, it is already there, if you use your own Windows computer, you'll have to download and install it first from www.chiark.greenend.org.uk.
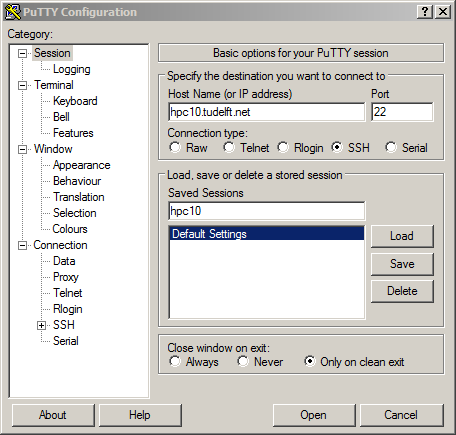
Once you have started PuTTY you'll get a configuration window als shown.
You can type the name of the cluster, for example 'hpc10.tudelft.net', in the field 'Host Name'. You can save the settings for a cluster by choosing a name for the session, enter it in the 'Saved Sessions' box and click 'Save'. The next time you open PuTTY the settings can be restored by clicking on the name and a click on 'Load'.
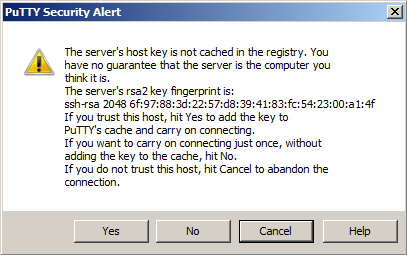
By clicking 'Open' a connection is made to hpc10.tudelft.net. If this is the first time you are connecting to the cluster, PuTTY will warn you that you are connecting to a previously unknown host.
You can confirm this connection by clicking 'yes' so PuTTY will store the host key in its database. You'll have to do this only once for every new server that you connect to.
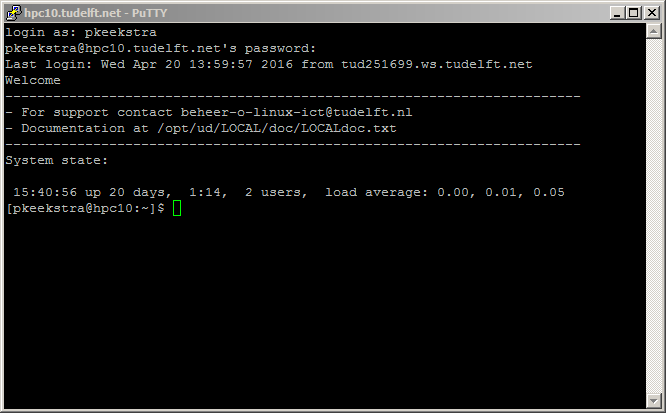
After you have accepted the connection, PuTTY opens a console and asks for your loginname. Once you have entered your NetID and your password, you are logged in to the cluster.
How to transfer files to and from Windows
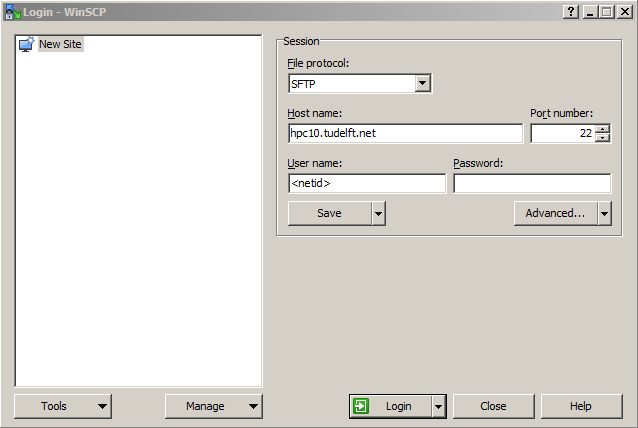
WinSCP is a freeware ftp client with support for secure file protocols sftp and scp. The login screen depicted below shows the settings for access within the University.
After clicking on 'Login' a warning about host keys will appear, similar to PuTTY. If it is the first time, you can safely click on 'yes' to accept.
Press 'Login'. If everything is setup correctly you are using the ssh tunnel the PuTTY bastion session has built and you are logged in on the cluster.
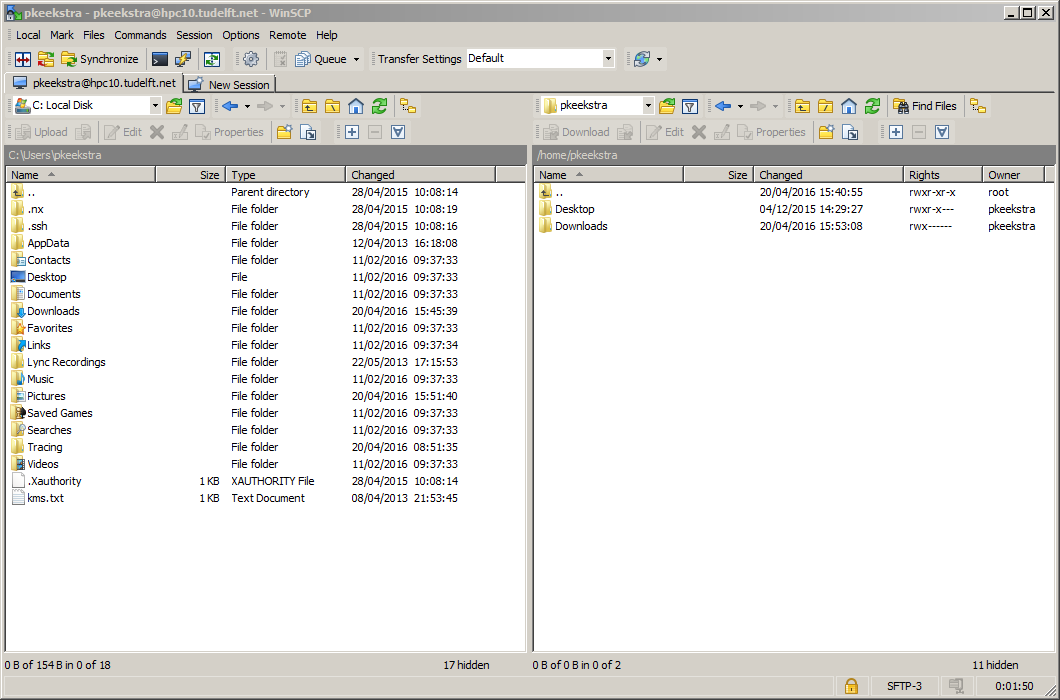
When logged in, you will see the commander-like interface below.
The left side displays the files in your home directory on the windows system. The right side displays the files on the cluster. You can drag and drop files between the two windows or select files with the mouse and press 'F5' for transfer to the other window.
How to log in from OS X or Linux
Mac OS X is in fact a full blown UNIX system under the hood. A terminal program comes standard with OS X, navigate with the finder to Applications -> Utilities to find it, the program is called 'Terminal'. There are many different flavours of Linux, each with their own desktop environments and customizations. Nearly every Linux system comes with a terminal program of some sort. Find the terminal program on your system and run it, once you get a command prompt type:
ssh <netid>@hpc10.tudelft.net
Where <netid> is of course your own netid.
Upon first access, ssh requires you to check if the host key is correct. Since this is the first time you connect to the system, it's fine to accept the host key by pressing 'y'.
How to transfer files to and from OS X or Linux
To transfer files you can use scp, which is very similar to ssh:
scp <netid>@hpc10.tudelft.net:~/projects.txt ~
This will copy the file 'projects.txt' from your remote home directory (folder) to the local home directory on your workstation or laptop.
If you want to copy an entire directory with all its content, use the '-r' option, like this:
scp -r <netid>@hpc10.tudelft.net:~/projects/ ~
This will copy the directory 'projects' from your remote home directory to the local home directory on your workstation or laptop.
Of course, it is also possible to copy files and directories from your workstation or laptop to the remote machine:
scp -r projects.txt <netid>@hpc10:~/
This will copy the file 'projects.txt' from your current working directory to the home directory on the remote machine.
scp -r projects/ <netid>@hpc10:~/
And this will copy the directory 'projects' and all its content from your current working directory to the home directory on the remote machine.
How to display graphical applications
Windows
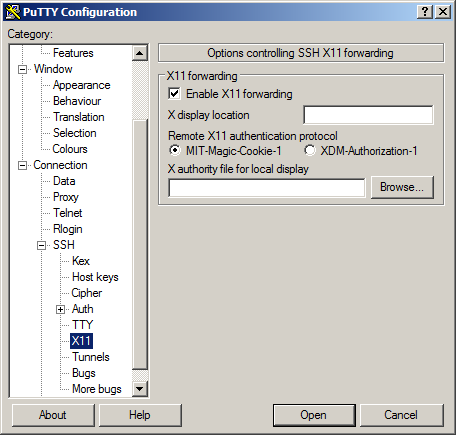
There are several options for displaying graphical applications on a Windows system. A basic option is Xming. You can download it from: http://www.straightrunning.com/XmingNotes/ The site asks for a donation to use the latest version, but there is also a public domain version which can be used for free. Once you have installed it, you can find it in the usual place in the start menu. Before you log in to an hpc cluster and run graphical applications, you need to start Xming first. It will not show much, only a small X in the system tray once it's running. You also need to enable X forwarding in PuTTY. For that you need to click on the + next to SSH in the session panel (left part of the window), then click on X11. You'll see a line on the right side that says "Enable X11 forwarding", click once on the white square next to that line and it will show a check mark.
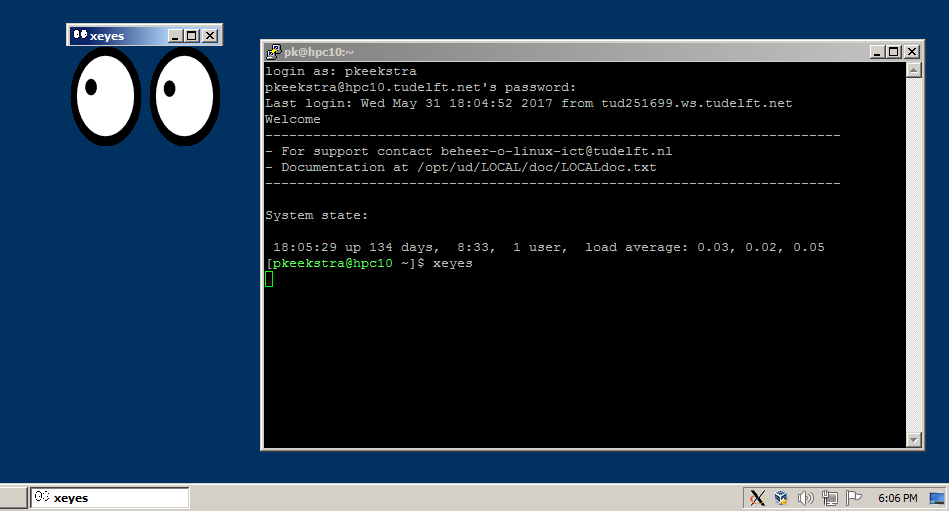
Now you can continue logging in to the hpc cluster. To check if X forwarding works, type xeyes on the command line, this will show a small window on your screen with two eyes that will follow the mouse pointer.
An alternative option for displaying graphical applications is Exceed, this is a commercial package for which the TU Delft has a license. It is not available by default on the standard Windows systems, but it can be installed upon request if you contact the servicedesk.
A second alternative is MobaXterm, this is an all-in-one solution containing an ssh client, X server and more. You can download a free version from: https://mobaxterm.mobatek.net/download.html The free version has some limitations, but it's still perfectly usable in our environment.
Mac OS X
For displaying graphical applications on a Mac OS X system you need a software package called XQuartz which can be downloaded from: https://www.xquartz.org/ This will run on Mac OS X v10.6 and higher. Once it's installed, you end up with an application called XQuartz located in /Applications/Utilties. There is no need to start it first before you log in to an hpc cluster, it will start automatically as soon as it is needed. The only thing you need to do is add the option -X to the ssh command that you use to log in:
ssh -X <netid>@hpc10.tudelft.net
You can test if this works by typing xeyes on the command line, this will show a small window on your screen with two eyes that follow the mouse pointer. If it doesn't work, try the -Y option:
ssh -Y <netid>@hpc10.tudelft.net
Linux
Most Linux workstations come with a graphical environment. This works transparantly with the graphical applications on the hpc clusters. The only thing you need to do is add the option -X to the ssh command that you use to log in:
ssh -X <netid>@hpc10.tudelft.net
You can test if this works by typing xeyes on the command line, this will show a small window on your screen with two eyes that follow the mouse pointer. If it doesn't work, try the -Y option:
ssh -Y <netid>@hpc10.tudelft.net
Authenticate
It is possible to access the group and bulk shares of your research group. It is required that you have logged in using your password. If you logged in with an ssh public/private keypair instead of your password, you need to authenticate first with:
kinit
This will ask you to type your password. This authentication is valid for about eight hours, after that you have to authenticate again.
Basic access
Now just type:
cd /tudelft/$USER/staff-group/
cd /tudelft/$USER/staff-bulk/
or
cd /tudelft/$USER/staff-umbrella/
and navigate from there to the directories that you need.
You can access your Windows home directory as well, the path is:
/tudelft/$USER/staff-homes/
followed by the first letter of your surname and then your netid. For example, if your name would be John Smith and your netid jsmith;
cd /tudelft/$USER/staff-homes/s/jsmith
If you are a student, replace 'staff' with 'student' to access your files.
cd /tudelft/$USER/student-homes/s/jsmith
Important note
The $USER part in the commands above is a shell variable that contains your netid. You can also substitute $USER for your netid yourself. If your netid would be jsmith, the command
cd /tudelft/jsmith/staff-homes/s/jsmith
would work just as well. Please do not substitute $USER with anything else than your own netid!
If you use anthing other than your own netid you'll create a recipe for potential disaster!
If you and a coworker need to access te same data on a group or bulk volume at the same time, you both use different paths. So
cd /tudelft/jsmith/staff-group/
only works if your netid is jsmith and
cd /tudelft/pbrown/staff-group/
only works works if your netid is pbrown.
If both netids have the same privileges for accessing the group volumes, then these commands give access to the same data.
