Remote Access: Difference between revisions
mNo edit summary |
mNo edit summary |
||
| Line 10: | Line 10: | ||
== Console access == | == Console access == | ||
The explanations below are the simplest way to connect to a console on an HPC. [[#Advanced configs|Advanced configs]] describes more complex configurations which save time when regularly using the connection. | |||
=== Command line === | === Command line === | ||
When your desktop/laptop supports ssh from the console, you can connect to the bastion server and from there you can connect to the HPC: | When your desktop/laptop supports ssh from the console, you can connect to the bastion server and from there you can connect to the HPC: | ||
| Line 24: | Line 25: | ||
When your desktop/laptop doesn't support ssh from the console, you can use [https://www.chiark.greenend.org.uk/~sgtatham/putty/latest.html Putty] (it may already be installed).<br> | When your desktop/laptop doesn't support ssh from the console, you can use [https://www.chiark.greenend.org.uk/~sgtatham/putty/latest.html Putty] (it may already be installed).<br> | ||
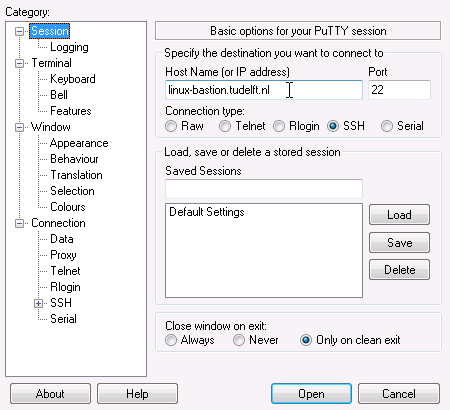
*Session Settings<br>Fill in the name of the TU Delft SSH server linux-bastion.tudelft.nl (student-linux.tudelft.nl for students), and select the SSH protocol (port 22):<br>[[File:PuTTY-Hostname.png]] | *Session Settings<br>Fill in the name of the TU Delft SSH server linux-bastion.tudelft.nl (student-linux.tudelft.nl for students), and select the SSH protocol (port 22):<br>[[File:PuTTY-Hostname.png]] | ||
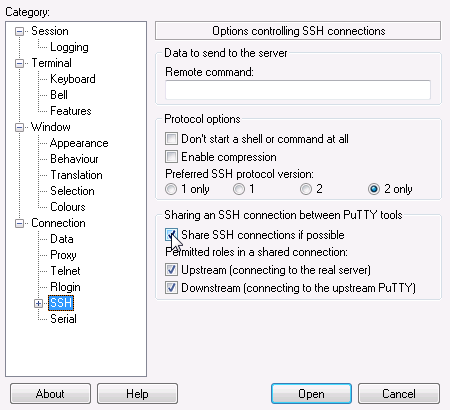
*Connection>SSH Settings<br>Select Share SSH connections if possible:<br>[[File:PuTTY-ShareConnection.png]] | *OPTIONAL: Connection>SSH Settings<br>Select Share SSH connections if possible (this means that you will not have to authenticate when you start a second session):<br>[[File:PuTTY-ShareConnection.png]] | ||
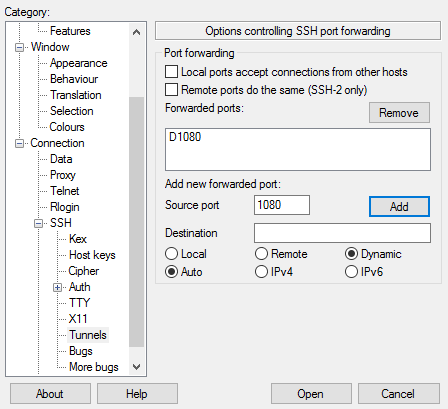
*OPTIONAL: [[File:PuTTY-Tunnels.png]] | |||
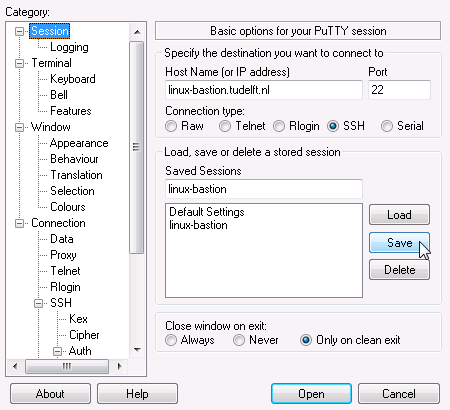
*Session Settings<br>To store these session settings, go back to the session tab, and save the settings under a session name. To activate a stored session, double-click on the session name:<br>[[File:PuTTY-SaveSession.png]] | *Session Settings<br>To store these session settings, go back to the session tab, and save the settings under a session name. To activate a stored session, double-click on the session name:<br>[[File:PuTTY-SaveSession.png]] | ||
Once you're connected to the bastion server you can use the locally available ssh to connect to a HPC: | |||
[netid@bastion]$ ssh <netid>@hpcXX.tudelft.net | |||
netid@hpcXX.tudelft.net's password: | |||
Welcome | |||
[netid@hpcXX]$ | |||
== File Transfer == | == File Transfer == | ||
=== Command line === | === Command line === | ||
=== Filezilla === | === Filezilla === | ||
Revision as of 10:42, 28 September 2021
Access to the HPC-clusters is limited from outside the TU Delft network for security reasons.
When you use a VPN-connection direct access from your desktop/laptop to the HPC is possible. You can use your application of choice for this connection.
When you don't use a VPN you should connect through a Bastion server, which is described below.
Bastion
The TU Delft offers two bastion servers. These servers can be used to tunnel your traffic to the HPC.
- linux-bastion.tudelft.nl for employees or guests.
- student-linux.tudelft.nl for students.
Console access
The explanations below are the simplest way to connect to a console on an HPC. Advanced configs describes more complex configurations which save time when regularly using the connection.
Command line
When your desktop/laptop supports ssh from the console, you can connect to the bastion server and from there you can connect to the HPC:
  [user@home]$ ssh <netid>@linux-bastion.tudelft.nl
    netid@linux-bastion.tudelft.nl's password:
  [netid@bastion]$ ssh <netid>@hpcXX.tudelft.net
    netid@hpcXX.tudelft.net's password:
    Welcome
  [netid@hpcXX]$
- Replace <netid> with your NetID (also remove the <>)
- When your a student replace <netid>@linux-bastion.tudelft.nl with <netid>@student-linux.tudelft.nl
- Replace <netid>@hpcXX.tudelft.net with the HPC you are connecting to.
Putty
When your desktop/laptop doesn't support ssh from the console, you can use Putty (it may already be installed).
- Session Settings
Fill in the name of the TU Delft SSH server linux-bastion.tudelft.nl (student-linux.tudelft.nl for students), and select the SSH protocol (port 22):
- OPTIONAL: Connection>SSH Settings
Select Share SSH connections if possible (this means that you will not have to authenticate when you start a second session):
- OPTIONAL:

- Session Settings
To store these session settings, go back to the session tab, and save the settings under a session name. To activate a stored session, double-click on the session name:
Once you're connected to the bastion server you can use the locally available ssh to connect to a HPC:
  [netid@bastion]$ ssh <netid>@hpcXX.tudelft.net
    netid@hpcXX.tudelft.net's password:
    Welcome
  [netid@hpcXX]$